Bending Over Backwards
My daughters were trying to teach themselves how to do back bends from a standing position. I was surprised to hear that while in the shower one morning one of my girls tried to do a back bend in the shower. When I asked her why she replied, Well, I needed to pick up the soap so I figured I'd do a back bend to grab it.
Uhhhhh....That makes perfect sense!
Still having a hard time wrapping my brain around this I asked her if she was able to do it. She said that, no, it ended badly. She slipped and fell on her head.
Holy crap! If that visual doesn't make you laugh I don't know what will!
Flying Dishes
I was sitting at my daughter's soccer game on a Saturday morning by myself. This was especially rare since I usually have a train of little people following me wherever I go. I had left the four other kiddos home to get their Saturday jobs done and play with the baby rather than take her out in the cold. I thought I'd be able to sit and enjoy the soccer game for the first time all year. But no. My phone continued to ring and ring and ring. I answered the phone to hear screaming on the other end of the line. I asked what was going on. The reply was, "Mom! CJ is throwing plates at us!" I was totally confused.
"What?" I asked.
"CJ is throwing plates at us! And I can't eat breakfast because he won't let me use a bowl!"
I knew I needed to get to the bottom of whatever fiasco was happening at my house. All I could visualize was plates flying across the room which is exactly what every mother wants going on when she's away from home. Glass plates? Paper plates? Plastic plates? What are we dealing with here? What will the damage be by the time I get home?
Apparently, CJ was in charge of doing the dishes that day and was in the process of loading and unloading the dishwasher. The other kids came into the kitchen to eat breakfast, which, in turn, would create more work for CJ. And CJ didn't want more dishes to clean. DUH!!! So he started throwing plastic plates at his brother and sister to keep them out of the kitchen and then he held the breakfast bowls hostage.
Sadly, the only thing that kept popping into my head was, "At least he's not throwing knives!"
Yes. I am still in the running for Mother of the Year. Pretty sure I've got it in the bag!
Saturday, October 19, 2013

Thursday, September 26, 2013
What's For Dinner
These 2 recipes are right up my alley. Simple and delicious. Yep! The best of both worlds.
Thanks, allrecipes.com!
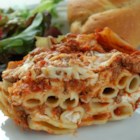
Baked Ziti I
|
 |
Submitted By: Colleen B. Smith
Photo By: cookin'mama
|

"Combine ziti pasta, prepared spaghetti sauce, and three kinds of Italian cheeses for a surprisingly quick and budget-friendly Italian casserole that's easy enough for a week-night meal or a covered-dish supper."
INGREDIENTS:
1 pound dry ziti pasta
1 onion, chopped
1 pound lean ground beef
2 (26 ounce) jars spaghetti sauce
|
6 ounces provolone cheese, sliced
1 1/2 cups sour cream
6 ounces mozzarella cheese, shredded
2 tablespoons grated Parmesan cheese
|
DIRECTIONS:
| 1. | Bring a large pot of lightly salted water to a boil. Add ziti pasta, and cook until al dente, about 8 minutes; drain. |
| 2. | In a large skillet, brown onion and ground beef over medium heat. Add spaghetti sauce, and simmer 15 minutes. |
| 3. | Preheat the oven to 350 degrees F (175 degrees C). Butter a 9x13 inch baking dish. Layer as follows: 1/2 of the ziti, Provolone cheese, sour cream, 1/2 sauce mixture, remaining ziti, mozzarella cheese and remaining sauce mixture. Top with grated Parmesan cheese. |
| 4. | Bake for 30 minutes in the preheated oven, or until cheeses are melted. |
| ALL RIGHTS RESERVED © 2013 Allrecipes.com | Printed from Allrecipes.com 9/26/2013 |
French Bread
|
 |
Submitted By: Jenn Hall
Photo By: lherman
|
"A crisp, crunchy crust and slightly chewy center make this bread as traditional as the breads served in France."
INGREDIENTS:
6 cups all-purpose flour
2 1/2 (.25 ounce) packages active dry
yeast
1 1/2 teaspoons salt
2 cups warm water (110 degrees F/45
|
degrees C)
1 tablespoon cornmeal
1 egg white
1 tablespoon water
|
DIRECTIONS:
| 1. | In a large bowl, combine 2 cups flour, yeast and salt. Stir in 2 cups warm water, and beat until well blended using a stand mixer with a dough hook attachment. Using a wooden spoon, stir in as much of the remaining flour as you can. |
| 2. | On a lightly floured surface, knead in enough flour to make a stiff dough that is smooth and elastic. Knead for about 8 to 10 minutes total. Shape into a ball. Place dough in a greased bowl, and turn once. Cover, and let rise in a warm place until doubled. |
| 3. | Punch dough down, and divide in half. Turn out onto a lightly floured surface. Cover, and let rest for 10 minutes. Roll each half into large rectangle. Roll up, starting from a long side. Moisten edge with water and seal. Taper ends. |
| 4. | Grease a large baking sheet. Sprinkle with cornmeal. Place loaves, seam side down, on the prepared baking sheet. Lightly beat the egg white with 1 tablespoon of water, and brush on. Cover with a damp cloth. Let rise until nearly doubled, 35 to 40 minutes. |
| 5. | With a very sharp knife, make 3 or 4 diagonal cuts about 1/4 inch deep across top of each loaf. Bake in a preheated 375 degrees F (190 degrees C) oven for 20 minutes. Brush again with egg white mixture. Bake for an additional 15 to 20 minutes, or until bread tests done. If necessary, cover loosely with foil to prevent over browning. Remove from baking sheet, and cool on a wire rack. |
| ALL RIGHTS RESERVED © 2013 Allrecipes.com | Printed from Allrecipes.com 9/26/2013 |
Monday, September 23, 2013
Canned Goods
In years past I've tried to can my own produce and stock my pantry shelves just like my mother did when I was a child. I have since learned that canning is very bitter sweet. There is something incredible about accomplishing something that now seems so old fashioned. And just like slaving in the yard and then scrubbing the dirt off your elbows at the end of the day, there's something extremely gratifying and fulfilling about standing in the kitchen for hours peeling fruit, blanching it, cutting it, canning it, and then processing it. I'm always a smelly, sticky, sweaty mess by the end of each canning day. But then I get to shower and lay in bed that night and listen to the lids "pop" as they announce that they are successfully sealed and ready to be stored. It's magical!
So far I've been slow and hesitant to can this year. Last year I threw in the towel before the canning season even started and blamed it on my job and newborn baby. This year I was determined to at least put up some peaches and pears. Unfortunately, I came home on a Friday night after a busy week of soccer and football to find that my peaches were ripe and needed attention immediately. So at 8:30 PM I started canning. My 3 oldest kids wanted to help like they usually do, so I taught them how to blanch the peaches and peel them and then leave for me to put in the jars. "Bleaching" the peaches quickly became the coveted job and I soon put a rotating schedule into action to resolve the bickering. Soon I noticed that the entire kitchen floor was not only wet but extremely sticky. I turned to see one of my daughters peeling and cutting the peaches on the counter top and warm peach juice splashing on the floor. I covered the floor with a table cloth and tried to pretend that this mess would magically be cleaned up when I awoke in the morning. (deep breaths....deep breaths....it's just juice...) Handsome came out periodically to see how things were going. His wide-eyed expression said everything as he shook his head and walked away.
About 2 hours into canning our peaches I noticed that the peaches were mushy and falling apart in my hands. Cutting them was impossible! As I watched the little factory we had created in our teeny kitchen I noticed that Ranger was on "bleaching" duty. He would place some peaches in the hot water on the stove, then transfer them to the sink, attempt to peel them, and if peeling was not up to his high standards, he would return the peaches to the blanching pot and repeat it over and over and over. My peaches were mushy because they were cooked! I salvaged what I could and threw the rest in the trash without the kids seeing. They continued to ask if I enjoyed their help. I half lied and told them that I did. And so we puttered along until about 11 PM when I turned off the stove and the Camp Chef and sent the kids to bed.
The following morning we ran to early morning soccer games and returned home for a lunch break. To my frustration my box of pears had ripened overnight and were fading fast. I lit the Camp Chef and started peeling pears. Ranger bounded into the kitchen and with excitement asked if he could help. He took particular interest in peeling the pears when he found out that we would not be blanching them. As he peeled and peeled he said, "Mom, I wouldn't tell my friends this, but I really like canning!"
Oh, you sweet boy! How can I not appreciate my mushy peaches and my bruised pears when you stand here for hours with your mom helping me can rather than play outside with your friends? I know that my jars on my pantry shelf are not near as "pretty" as the ones Grandma puts up, which was always a priority. But thanks to my cute kids I got both my peaches and pears done which is more than I would've accomplished on my own. And every time I look at those peaches and pears it makes me smile. I am so grateful for those simple reminders of how incredibly blessed I am to be a mother.
Subscribe to:
Posts (Atom)